Northern cold frames have been designed to allow early soil warming and protection against unseasonable frosts. The following page outlines the steps for constructing a cold frame that uses a heat sink principle to warm the soil and a sheltering cover that can be easily removed and replaced for frost protection. This design differs from the typical raised bed with a cover by using air flow over a bed or rocks that underlay's the soil. This air movement warms the rocks and the soils far earlier than the simple raised bed. This extends the growing season for northern gardeners, allowing earlier starts to the growing season and later harvest periods..
|
Construction of Cold Frames for Northern Climates
The following step by step plans for building cold frames were prepared for a Yukon Secondary school . The materials for the cold frame (along with 2013 costs) are listed below and illustrations are provided for each construction step. Eleven steps have been outlined with related sketches designed to assist in construction of northern cold frames |
Step 1 Cut all the lumber to specified lengths. Assemble the PWF cross section pieces, use gussets to attach the 2x4's to the ends of the 4x4's, as shown.
Step 2 Evenly space the cross sections along the length of the 2x8x14' boards. Screw into place. They should rest on the 2x4's that are the lower cross section members. Be careful not to break the upright 4x4's , They will be stronger once the redi rod has been put in place following the poly and coroplast.
Step 3 Screw the 2x2x30" pieces to the ends of each long section. These become the supports for the ends of the cold frame.
Step 4 Screw the 2x8x5' sections to the 2x2's to form the ends of the cold frame.
Step 5 Tip the cold frame up, then line the bottom and all sides with the 6 ml poly. Staple the poly to the sides of the cold frame and poke two or three holes in the bottom of the poly liner. Then nail the four 1"x1"x26" pieces on top of the poly, spaced along the inside of the cold frame.
Step 6 Use the 1x1x26 pieces to nail the coroplast to the sides of the cold frame so that the 1"x1" spacers are spread along the length of the cold frame sides.
Step 7 Place the perforated PVC pipe along the mid line of the bottom of the cold frame. Cap the open end and place a 90 deg elbow with the 30 inch section held vertically. Tie the vertical section in place. You may want to install a second 90 deg elbow to keep rain and soil out of the pipe. Install a salvaged 4" computer fan in the upper section of the pipe and wire the fan into a suitable adapter. Match the fan and adapter power output.
Step 8 Drill 5/8" holes half way up the 4x4 cross sections. Drill a recess on the outsides of the 4x4's to accommodate the washers and nuts. Then thread the 1/2"x6' redi rod through the holes. Bolt into place. These redi rods keep the cold frames from spreading out when filled.
Step 9 Fill the cold frame up to the top of the redi rods with cobbles that are 2" to 4" in diameter. This size allows the air to flow over the rocks while having a large surface area that permits them to warm quickly. Then place geotec fiber over the cobbles and fill the cold frame with top soil. You can screw 2x4x14 along the top of the cold frame side to provide a shelf for planting and tending the cold frame.
Step 10 The frost cover is made from 11 ml clear poly, nylon fabric from Northern Green House Supplies. The frost cover is supported by a frame made from 3/4 inch bent EMT galvanized pipe. The frost cover is sandwiched to the northern side of the cold frame using the 1"x3"x14'. The other side is sandwiched between the other two 1x4x14 's . This can the be placed over the metal frame or removed quite easily.
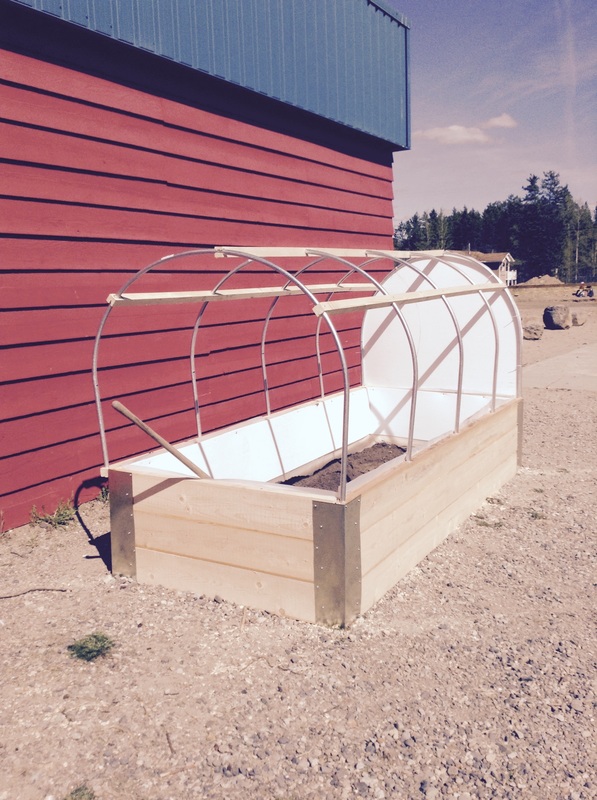
Step 11 All five of the 10' long sections of EMT are bent on a jig to ensure they are all the same shape. The frames are then covered with sections of poly 3/4 tubing, leaving the bends and the end 4" free. One inch holes are drilled in the 2x2 posts to accept the ends of the EMT frames. The sections of 2x2 are attached to the EMT using self drilling, self tapping screws.
Step 2 Evenly space the cross sections along the length of the 2x8x14' boards. Screw into place. They should rest on the 2x4's that are the lower cross section members. Be careful not to break the upright 4x4's , They will be stronger once the redi rod has been put in place following the poly and coroplast.
Step 3 Screw the 2x2x30" pieces to the ends of each long section. These become the supports for the ends of the cold frame.
Step 4 Screw the 2x8x5' sections to the 2x2's to form the ends of the cold frame.
Step 5 Tip the cold frame up, then line the bottom and all sides with the 6 ml poly. Staple the poly to the sides of the cold frame and poke two or three holes in the bottom of the poly liner. Then nail the four 1"x1"x26" pieces on top of the poly, spaced along the inside of the cold frame.
Step 6 Use the 1x1x26 pieces to nail the coroplast to the sides of the cold frame so that the 1"x1" spacers are spread along the length of the cold frame sides.
Step 7 Place the perforated PVC pipe along the mid line of the bottom of the cold frame. Cap the open end and place a 90 deg elbow with the 30 inch section held vertically. Tie the vertical section in place. You may want to install a second 90 deg elbow to keep rain and soil out of the pipe. Install a salvaged 4" computer fan in the upper section of the pipe and wire the fan into a suitable adapter. Match the fan and adapter power output.
Step 8 Drill 5/8" holes half way up the 4x4 cross sections. Drill a recess on the outsides of the 4x4's to accommodate the washers and nuts. Then thread the 1/2"x6' redi rod through the holes. Bolt into place. These redi rods keep the cold frames from spreading out when filled.
Step 9 Fill the cold frame up to the top of the redi rods with cobbles that are 2" to 4" in diameter. This size allows the air to flow over the rocks while having a large surface area that permits them to warm quickly. Then place geotec fiber over the cobbles and fill the cold frame with top soil. You can screw 2x4x14 along the top of the cold frame side to provide a shelf for planting and tending the cold frame.
Step 10 The frost cover is made from 11 ml clear poly, nylon fabric from Northern Green House Supplies. The frost cover is supported by a frame made from 3/4 inch bent EMT galvanized pipe. The frost cover is sandwiched to the northern side of the cold frame using the 1"x3"x14'. The other side is sandwiched between the other two 1x4x14 's . This can the be placed over the metal frame or removed quite easily.
Step 11 All five of the 10' long sections of EMT are bent on a jig to ensure they are all the same shape. The frames are then covered with sections of poly 3/4 tubing, leaving the bends and the end 4" free. One inch holes are drilled in the 2x2 posts to accept the ends of the EMT frames. The sections of 2x2 are attached to the EMT using self drilling, self tapping screws.
